e39 Ellipsoids HEADLIGHTS
DIY Install Guide
| Unplug the low-beam, high-beam, and combined turn-signal/parking light connectors. Xenon assemblies also have a self-leveling motor connector as well as a slightly different low-beam connection point into the ballast (not pictured). |
The connectors should look like this. Please Note: If you accidentally remove the turn-signal/parking light socket instead of just the connector, you might notice the mounting arms are fragile and could snap off (see red arrow). |
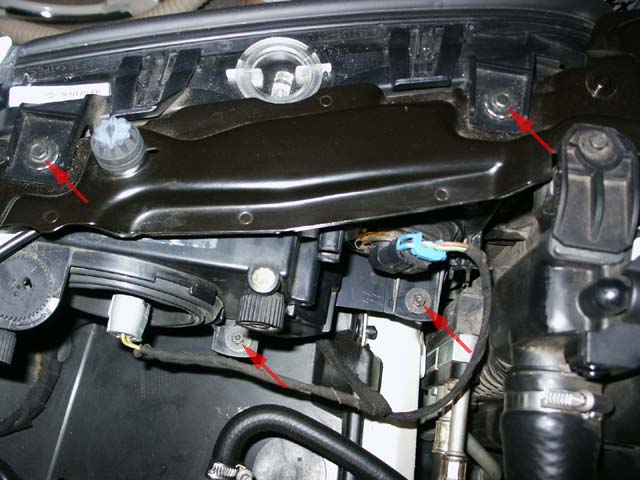
| Carefully remove the (4) 8mm mounting screws. Make note that the upper screws have serrated washers and the bottom screws have flat washers. |
Use the magnetic pick-up tool to help retrieve the lower screws as they can easily drop down below. |
| Pivot the inner edge of the assembly outwards. Take care to protect the bumper while doing so. |
The outer connection point should release and the assembly can be carefully slid out forwards. |
| The painted strip can be removed by prying up slightly and clearing the (2) tabs (see red arrows). At the same time, the hook on the edge must be released (see blue arrow and inset pic). The hook is fragile and breaks easily, so use care when removing. |
Score and break the (2) top latches which are plastic-welded (see blue arrows). Release the inner side latch (see red arrow). |
| Release the (3) bottom latches. |
Release the outer side latch. |
| Carefully separate the two halves. |
Clean the lenses prior to reinstallation. Don't allow dust or debris to fall into the plastic lenses as they scratch very easily. Blow out any dust prior to installing the lenses. |
| Re-assemble the parts and swing the assembly back in by following Step 5, then Step 4. When re-installing try to match up the serrated marks and washer indents to preserve alignment. |
Check to see if the assemblies line-up properly. The screw points have some play to allow them to be moved around a bit. Check that all the bulbs work properly and have the head lights professionally aimed. |